
AcoustiMatch
User Guide, version 1.4
AcoustiMatch
User Guide, version 1.4
About AcoustiMatch
A pickup and a microphone hear an acoustic instrument very differently. The pickup gives you feedback-free volume on stage, but it sounds thin and quacky next to a good mic. AcoustiMatch closes that gap. You record half a minute or so of playing through both at once, and AcoustiMatch works out a filter that makes the pickup sound like the mic. You can shape it further with EQ, then export it as an impulse response (IR) to load into a pedal, amp or IR loader.
Contents
- Installing
- Recording the pickup and mic
- Quick start
- Overview
- Adjusting with EQ points
- The Attack setting
- Enhance
- Exporting an IR
- Menu and settings
- Getting a better match
- Troubleshooting
- Feedback and support
Installing
Mac
AcoustiMatch runs on Apple Silicon Macs (M1 or later) with macOS 14 or newer. The download contains three versions. Install the ones you need:
| File | Use it for | Copy it to |
|---|---|---|
| AcoustiMatch.app | The standalone app | Applications |
| AcoustiMatch.component | Logic Pro and GarageBand (AU) | ~/Library/Audio/Plug-Ins/Components |
| AcoustiMatch.vst3 | Ableton Live, Reaper, Cubase and most other DAWs (VST3) | ~/Library/Audio/Plug-Ins/VST3 |
The Library folder is hidden by default. In Finder, choose Go › Go to Folder and paste the path. Restart your DAW afterwards so it picks up the new plug-in.
Windows
For Windows 10 or 11 (64-bit), the download contains the standalone app,
AcoustiMatch.exe, which you can keep anywhere, and the VST3 plug-in,
AcoustiMatch.vst3, which goes in C:\Program Files\Common Files\VST3.
The Windows build isn't code-signed yet, so the first time you run it SmartScreen may say it protected your PC. Click More info, then Run anyway.
The first time AcoustiMatch opens, you'll be asked to accept the license agreement. Click I agree and you won't see it again on that computer unless the agreement changes.
Recording the pickup and mic
Everything starts with a recording. AcoustiMatch compares the pickup with the mic, so it needs both signals from the same performance, recorded at the same moment. Plug the pickup into one input of your audio interface (directly or through a DI box), put a mic on the instrument and plug it into another input, and record both tracks together.
- Each signal gets its own mono track and its own file. Don't put the pickup and mic on the left and right of a single stereo file, and don't use a stereo pair of mics. AcoustiMatch reads only the first channel of a file.
- Use WAV, AIFF or FLAC files, 24-bit or 16-bit. MP3 or AAC won't do.
- Both files need the same sample rate and the same length. If you record both tracks in one pass and export them over the same range, this takes care of itself.
- Record at least 25 seconds of playing. Thirty seconds to a minute is better.
- Keep the pickup track dry: no EQ, compression or reverb. Keep the mic free of compression and reverb too, but EQ on the mic is fine and often helps (see Shaping the mic sound).
- Normalize both files so each peaks at −1.0 dB. This gives a strong IR. Don't trim one file without trimming the other the same way.
When you export from your DAW, export each track on its own rather than a mix. If there's a choice between mono and split stereo, choose mono.
Play the way you normally would, but cover the instrument: low and high, chords and single notes, soft and loud. The match only knows about what it heard.
Quick start
If you've already recorded, use the standalone app. If you'd rather work inside your DAW session, use the plug-in. Either way the result and the exported IR are the same.
In the standalone app
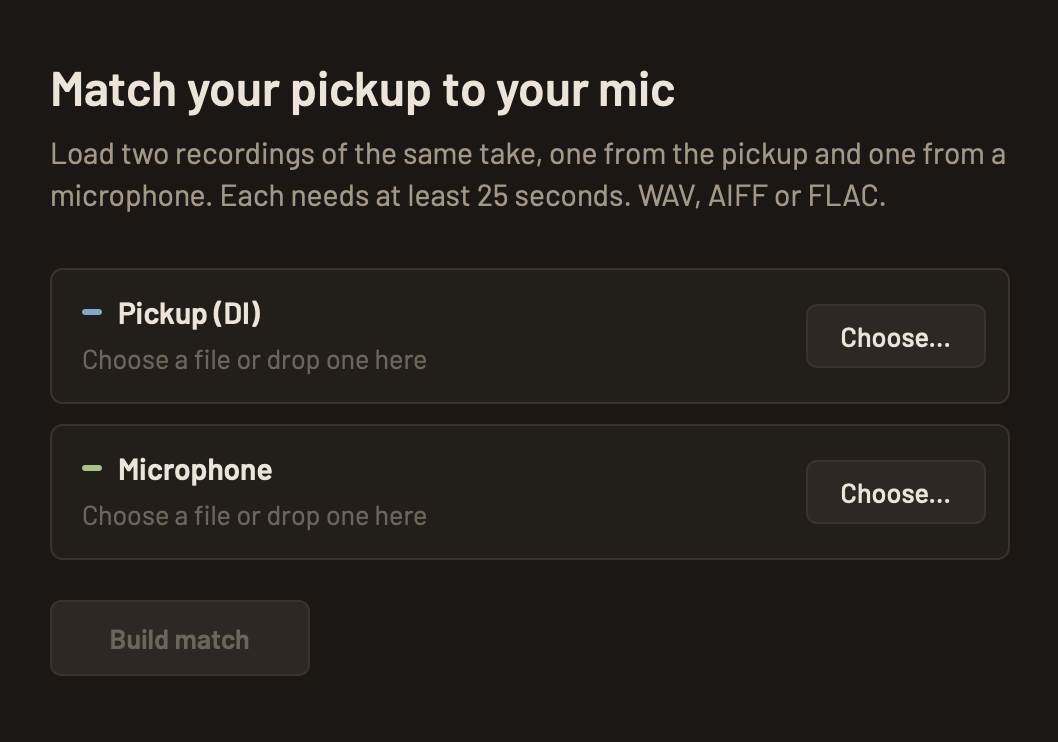
- Click Choose… next to Pickup (DI) and Microphone and pick your files, or drag them onto the window. If you drag both in at once, the one with "mic", "room" or "air" in its name goes in the Microphone slot.
- Click Build match. After a few seconds the graph appears with the match drawn on it.
- Press Space to play, and use the switch at the bottom right to compare: Pickup is the raw pickup, Matched is the pickup through AcoustiMatch, and Mic is the microphone. Flipping between Matched and Mic is the quickest way to judge the result. Click or drag on the timeline to jump around.
- Fine-tune with EQ points and the Attack setting if you like, then click Export IR… (see Exporting an IR).
To start again with other files, click Load other recordings and confirm. This clears the current match but keeps your EQ points, so export an IR first if you want to keep it.
In your DAW
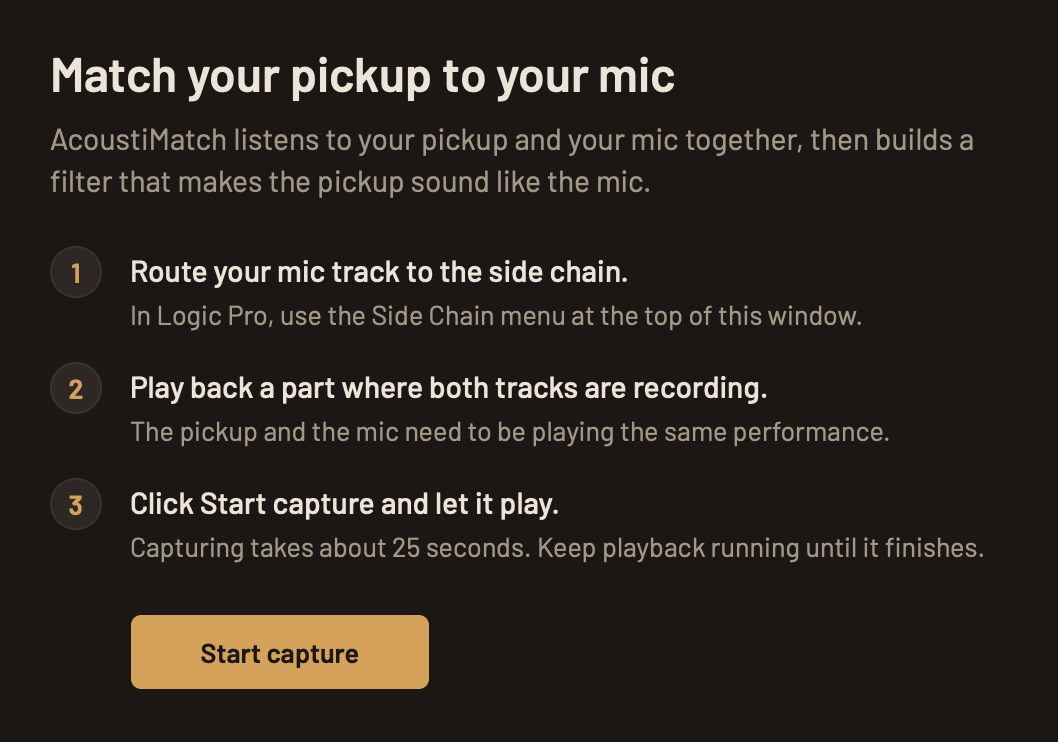
- Put AcoustiMatch on the pickup track and send the mic track to its side chain input. In Logic Pro there's a Side Chain menu at the top of the plug-in window. Other DAWs put side chain routing in their plug-in input or routing options.
- Start playback from a section where you're playing, then click Start capture. Let it run for about 25 seconds until the progress bar fills, with playback going the whole time. You can click Stop early, but a full capture gives a better match.
- Click Build match. The pickup track now plays through the match. Use the power button in the toolbar to bypass AcoustiMatch, and solo the mic track to hear what you're aiming for.
- Fine-tune if you like, then click Export IR…. To start over, choose Capture again and confirm; any EQ points you've added are kept.
AcoustiMatch saves your EQ points (shapes and slopes included) and Attack and Enhance settings with the DAW project, but not the match itself. When you reopen the project you'll need to capture again, so export an IR before closing if you want to keep the result.
If nothing seems to happen during capture, check that playback is running and look at the green Mic line on the graph. If it stays flat, the side chain isn't connected.
Overview
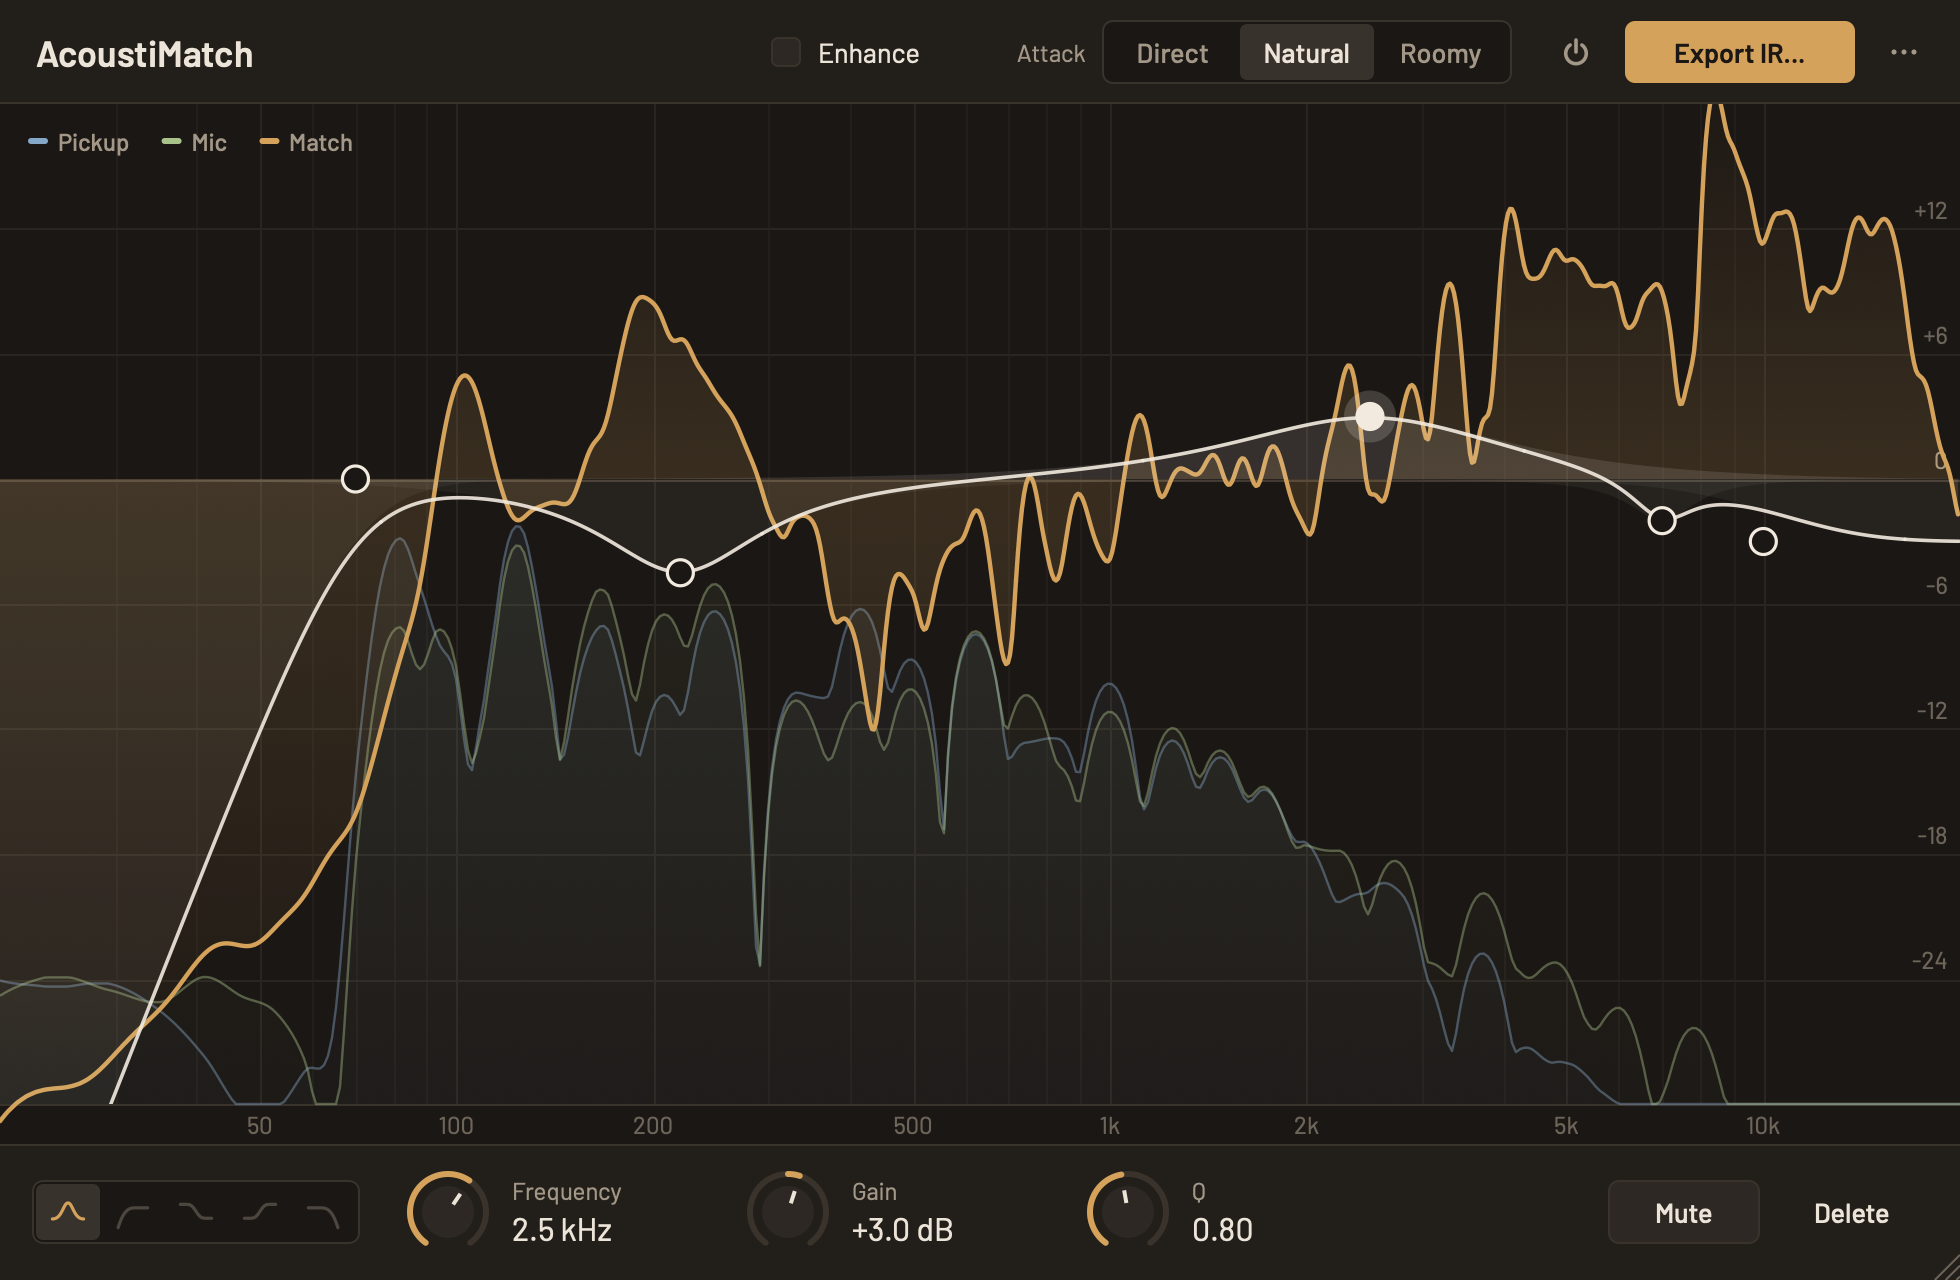
Once a match is built, everything happens in one window. The graph runs from 20 Hz on the left to 20 kHz on the right.
1
2
3
4
5
6
7
8
9
10
- Enhance smooths the narrow peaks and notches in the top end. See Enhance.
- Attack softens the pickup's hard attack. See The Attack setting.
- Bypass (plug-in only) switches AcoustiMatch off so you can compare.
- Export IR… saves the result as a WAV file. See Exporting an IR.
- The ⋯ menu holds Clear all EQ points, Capture again and Settings. See Menu and settings.
- The bronze Match curve is the correction AcoustiMatch applies to the pickup: above the center line it's boosting, below it's cutting. It changes slightly with the Attack and Enhance settings.
- While audio plays, the blue line shows the pickup's spectrum and the green line the mic's.
- The light EQ curve shows all your EQ points combined.
- Each EQ point is a dot you can drag. The selected one is filled in. See Adjusting with EQ points.
- The bottom bar holds the selected point's controls, or Add EQ point when none is selected.
Adjusting with EQ points
Often the match is all you need. If you want to change it, maybe to tame some boom or add a bit of air, you can put up to 16 EQ points on top of it. Whatever you hear is what gets exported, EQ points included.
Adding a point
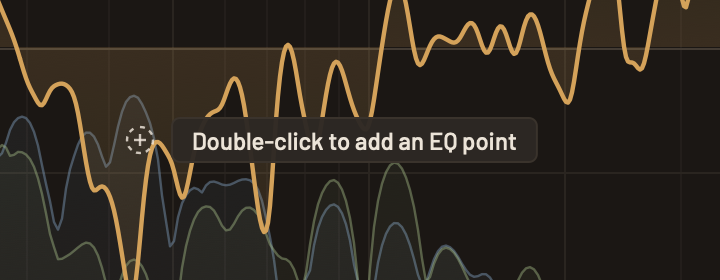
Double-click an empty part of the graph to add a bell where you clicked. While you hover over the graph, a small + under the pointer shows where a double-click would put one. You can also click Add EQ point in the bottom bar and pick a shape, or right-click an empty part of the graph and choose a shape to add there.
Point controls
Click a dot to select it. Its controls appear in the bottom bar, from left to right:

- Shape
- Five buttons for the point's shape. Shapes that don't fit where the point sits are greyed out; hover over one to see why.
- Frequency
- Where the point sits, from 20 Hz to 20 kHz.
- Gain, or Slope for a cut
- Gain boosts or cuts by up to 24 dB. A cut has no gain; instead its Slope sets how steep it is: 6, 12, 18, 24 or 48 dB per octave.
- Q
- How wide a bell is, or how sharp a shelf's corner is. On a cut it adds a bump just before the cut; 0.71 is smooth. A 6 dB/oct cut has no Q.
- Mute and Delete
- Mute switches the point off without losing it, which is handy for checking whether it's helping. Delete removes it.
Drag a knob, or double-click the number next to it to type a value; for frequency, "2.5k" works. Double-clicking a knob resets it: 1 kHz, 0 dB, 12 dB/oct, and a Q of 1.0 for a bell or 0.71 for the other shapes. When you change a point to a different kind of shape, its Q goes back to that shape's default.
Shapes
| Bell | Boosts or cuts a range around its frequency. |
| Low cut | Removes everything below its frequency (a high-pass filter). |
| Low shelf | Raises or lowers everything below its frequency by the same amount. |
| High shelf | Raises or lowers everything above its frequency by the same amount. |
| High cut | Removes everything above its frequency (a low-pass filter). |
Points keep a fixed order from left to right: a low cut or low shelf, then the bells, then a high shelf or high cut. You can have either a low cut or a low shelf, not both, and the same goes for the high end. Only the lowest point can become a low cut or low shelf, and only the highest can become a high shelf or high cut. You can't add a bell below a low cut or low shelf, or above a high shelf or high cut, and a dragged dot stops when it reaches one of them.
Mouse and keyboard
| To do this | Do this |
|---|---|
| Add a bell | Double-click an empty part of the graph |
| Add any shape | Right-click an empty part of the graph, or click Add EQ point |
| Move a point | Drag its dot: left and right for frequency, up and down for gain. A cut's dot sits on the center line and only moves left and right. |
| Change only the gain | Hold Shift while dragging |
| Find 0 dB again | Drag through the center line; gain sticks there briefly |
| Change Q | Scroll over the dot |
| Shape, slope, mute, reset Q, delete | Right-click the dot |
| Remove every point | Clear all EQ points in the ⋯ menu |
The Attack setting

Piezo pickups in particular have a hard, quacky attack on every note that a mic just doesn't hear. EQ can't fully fix it, so AcoustiMatch has a separate control for it in the toolbar:
| Direct | The closest match to the mic, but the pickup's sharp attack stays. |
| Natural | Softens the attack while still sounding close to the mic. This is the default. |
| Roomy | Removes the quack entirely, at the cost of a little room and distance. |
Which is best depends on the instrument and how you play it. A fingerpicked part might suit Direct, while hard strumming often sounds better on Natural or Roomy. All three play at the same loudness, so you can switch while listening and compare them fairly. Attack affects what you hear, the Match curve and the IR you export.
Enhance
A match can have narrow peaks and notches in the high frequencies (comb filtering from the instrument's body and the room) that can sound a little “phasey”. Tick Enhance, to the left of Attack, to smooth them out. It averages the match over 1/24-octave steps, which changes the response by about 2–3.5 dB above 4 kHz and by less than 1 dB below that, so the body and midrange stay as they were.
It's off by default. Like Attack, it affects what you hear, the Match curve and the IR you export, and it works with every Attack setting. It plays at the same loudness as without it, so you can switch it on and off while listening and keep whichever you prefer.
Exporting an IR
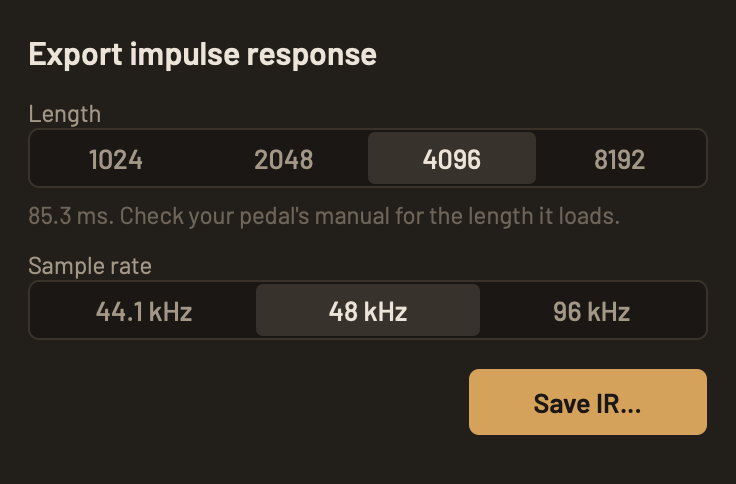
Click Export IR…, choose a length and sample rate, then click Save IR… and pick where to save the WAV file. The IR sounds like what you hear, with your Attack, Enhance and EQ settings.
- Length
- 1024, 2048, 4096 or 8192 samples. Many pedals and amps take 1024 or 2048. Longer IRs hold more low-end detail, but not every device accepts them. If your device takes 2048, use it rather than 1024, which can be a few dB off below about 200 Hz; for an IR loader plug-in in a DAW, use 4096 or 8192. The panel shows the length in milliseconds too, since some manuals list it that way.
- Sample rate
- 44.1, 48 or 96 kHz. Use the rate your pedal expects, or your session's rate in a DAW.
The right settings depend on what will load the IR, so check its manual. The file name includes the Attack setting, and Enhance when it's on, for example AcoustiMatch IR Natural.wav or AcoustiMatch IR Natural Enhanced.wav, so you can export several and compare them on your rig.
Menu and settings
The ⋯ button at the top right holds Clear all EQ points, Capture again (Load other recordings in the app), Settings, the license agreement and third-party notices, and About AcoustiMatch.
Settings has one option, Interface size, which scales the whole window to 100, 115, 130 or 150%. It applies to the app and the plug-ins. On a Mac the app also opens Settings with ⌘,. You can resize the window by dragging its bottom-right corner.
Getting a better match
The match can only be as good as the mic recording, so spend a few minutes on mic placement before you record. Put the mic where the instrument sounds best to you. For a guitar, somewhere around 6–12 in (15–30 cm) from where the neck meets the body is a good place to start. Record in a quiet room, because any noise in the mic track becomes part of the match.
Leave plenty of headroom on both tracks; clipping on either one will throw the match off. Set the pickup's tone, volume and blend controls the way you'll use them on stage, because the IR will only sound right with the same settings.
A match belongs to one instrument, pickup and mic. If you change any of them, make a new one.
Shaping the mic sound
AcoustiMatch makes the pickup sound like the mic track, so the best results come from a mic track that already sounds exactly the way you want the instrument to sound. Before you export the mic file, put an EQ on the mic track in your DAW and shape it to taste. This usually gives a better match on the first try than fixing things afterwards. If you can't EQ the mic before exporting, use EQ points in AcoustiMatch instead.
Think about where you'll use the instrument. In a full band, a guitar rarely needs its lowest frequencies, because the bass already fills them, so a low cut (high-pass filter) on the mic keeps the guitar out of the bass's way. For solo playing you may want no low cut at all, or a very gentle one that only removes rumble.
These are only starting points. Experiment to find what sounds best for your instrument and the way you play.
Troubleshooting
| Message or problem | What to do |
|---|---|
| Files must have the same sample rate. | Export both tracks again at the same sample rate. |
| Files must be the same length… | The two files have to come from the same take. AcoustiMatch allows up to half a second of difference. Export both tracks over the same range. |
| Recordings must be at least 25 seconds long… | Use a longer take. |
| Could not read pickup file. / Could not read microphone file. | Export the track again as an uncompressed mono WAV and check that it plays in another app. |
| No valid training frames found. | The files are silent or nearly silent. Make sure you exported the right tracks. |
| The plug-in doesn't appear in my DAW | Check it's in the right folder (see Installing), then restart the DAW or rescan plug-ins. Logic Pro uses the AU version; most other DAWs use VST3. |
| Capture doesn't move | Playback has to be running and the mic track has to be routed to the side chain. |
| The match sounds wrong | Make sure both files are the same performance, recorded together. A longer take with more variety helps, and so can a different Attack setting. |
| My pedal won't load the IR | Export again at a shorter length, or at the sample rate the pedal expects. |
Feedback and support
AcoustiMatch is free, and hearing how the IRs work on real rigs is the most useful thing for its development. You can reach us through Send feedback in the About window or at molinellomusic.com/contact. If you're stuck, email support@molinellomusic.com.